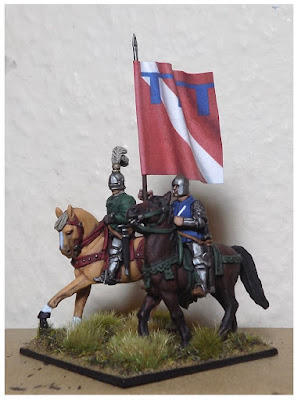
Here's a quick guide for making interchangeable paper flags, or at least the way I do it.
I use them just for heraldic banners, which are all the same size and shape. They are for swapping between command stands as well as certain units of men-at-arms that are led by commanders in person, so I can quickly switch them out to represent different nobles. A few of my command stands have permanent flags, but the majority of them are interchangeable.
To make them truly interchangeable, you'll want to make the flags all the same size (I go for 30mm square) and the flagpoles the same height (I go for 65mm).
Another tip I learned along the way - when bending the flags into their 'rippled' form (assuming that's what you do), you'll want to use the same sort of shape for each one. It might go fine with one figure, but putting in onto another one you could find it collides with the standard bearer's head, so it's a good idea to keep the shape roughly consistent.
You should also think whether the flags are going on to be held in the right or left hand - if you have them 'rippled' to fit on a pole held in the right hand, they might not work on one in the left hand (the flag hitting the head again). For that reason, I've made sure all my interchangeable flags are in the right hand - all cavalry figures hold it in the right hand, I just have to be careful selecting which foot figure I use (most infantry figures seem to hold in the flag in the left hand, so these I use for permanent flags).
So, you want the flag pole to be in two parts - the top 20mm or so cut off before you paint the figure. For my 65mm flagpoles, I got for a 25/40mm divide. Paint the top part separately as well - I just paint the whole thing silver with a dark wash (as it's just the spearhead itself that will be showing) and make sure to give it a good coat of varnish.
After painting the edges of the flag, I glue both sides together with PVA. I use a spare wire spear to mould it around, shaping the ripples carefully, and removing it from the wire once it's in the shape I want it. Then let it dry.
Now you have three separate components - the 40mm 'half-pole' on the miniature, the separate top 25mm of the pole, and the flag itself. Glue the top bit into the flag 'loop' with a small dab of superglue. Be careful not to put it in too far, or not far enough - you will only get half a second before the superglue fixes to the paper, and then it will be too late! The length of the flagpole will be 65mm, but how far in you stick the top piece will determine how high up the pole the flag is (and also will effect the stability of the flag when in use).
When you are folding and gluing the flag together on the temporary guide spear, make sure to get a real tight fit. However you might want to have the lower opening 'loop' wider than the top, to make placing it on the half-pole easier.
And here's the final tip - apply multiple layers of thick gloss varnish to the top 10mm of the half-pole, to ensure the fit is extra snug. You don't want the flag moving around at the slightest touch - if it seems to be doing this, add more layers of varnish to 'thicken' the pole.
Now I know some people like to use a brass tube inside the paper flag to slot over the half-pole. I don't find this is necessary, and you can do it with just the paper like I do. The attachment will be more 'invisible'. Just having the paper might make them a bit more delicate, but I've never damaged them and can't really imagine how I would do so. Though to be fair it's even less of a concern for me as I make and print off all these flags myself, so if I was to damage one, I'd just print off a replacement.


Hi Charlie - great tip and approach; defiantly looks better than the changeable flag being on a thicker brass tube. All the best
ReplyDelete